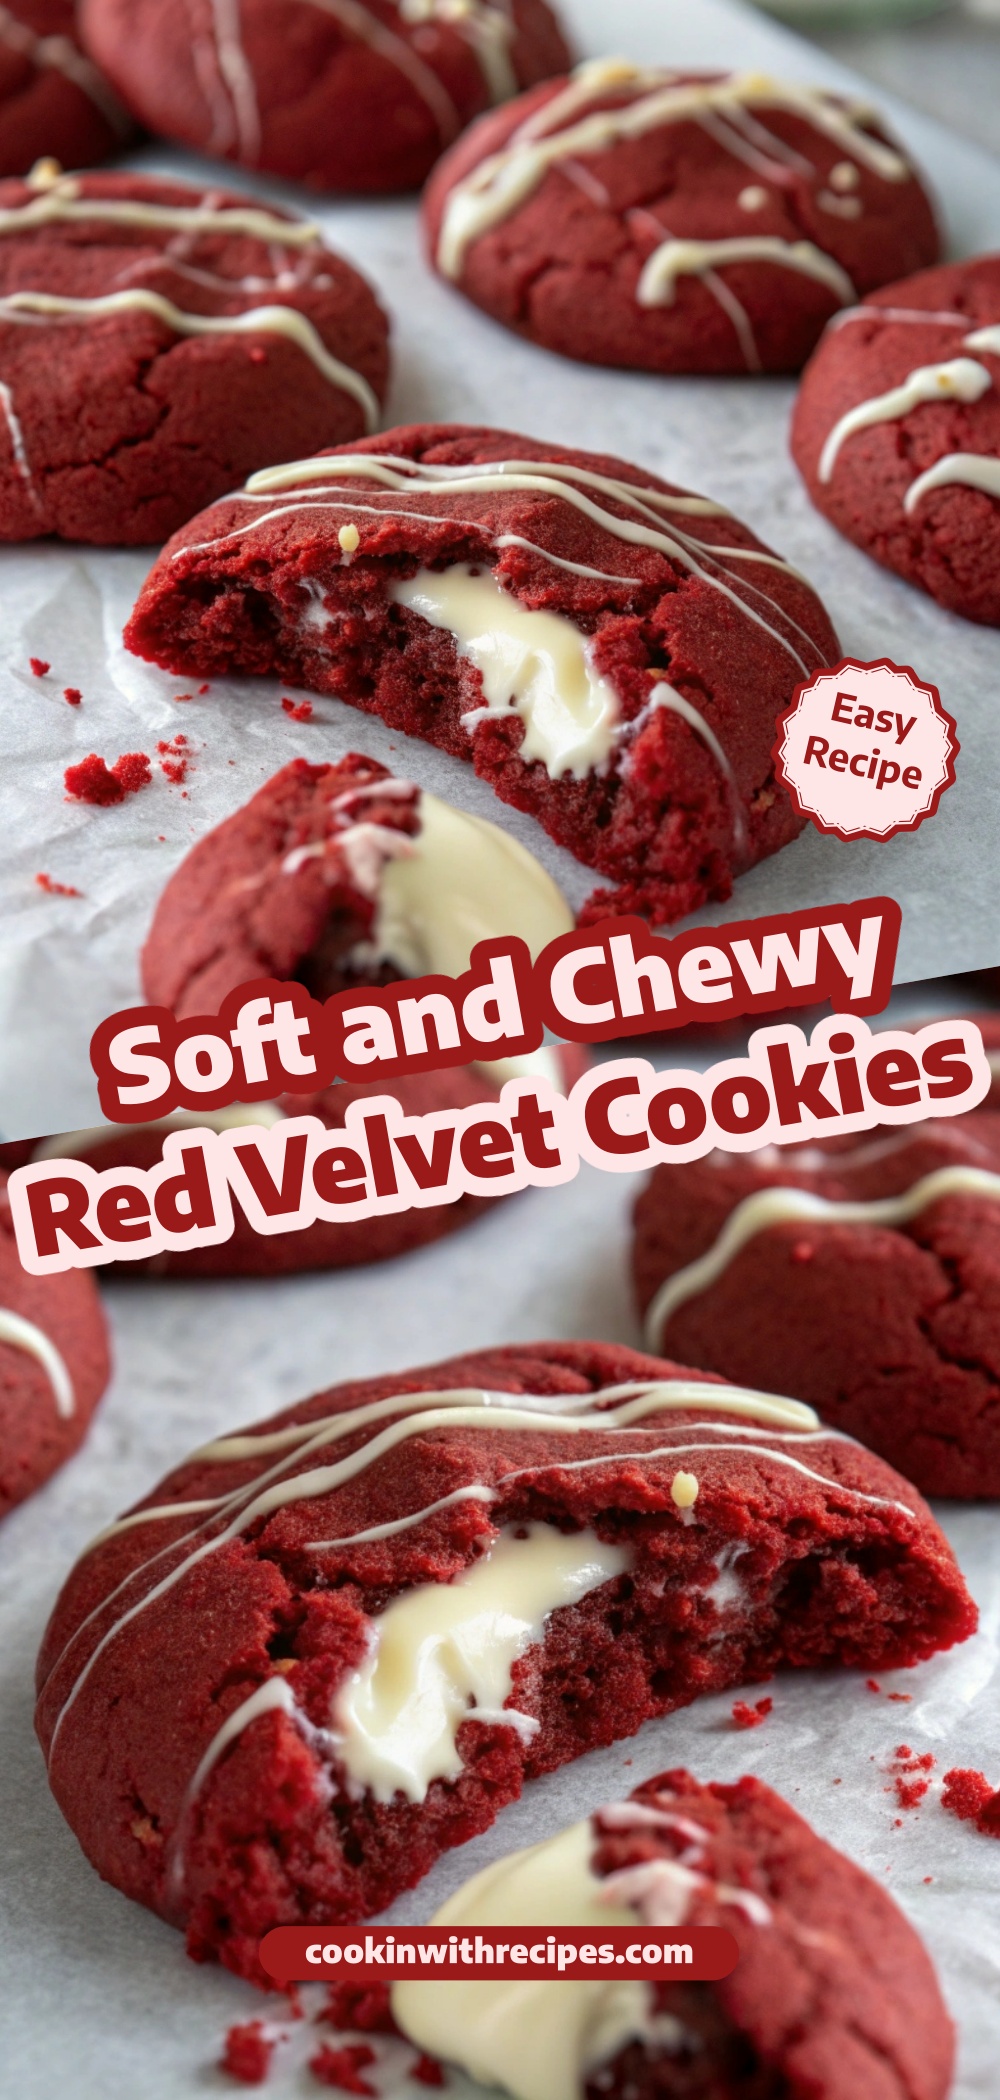
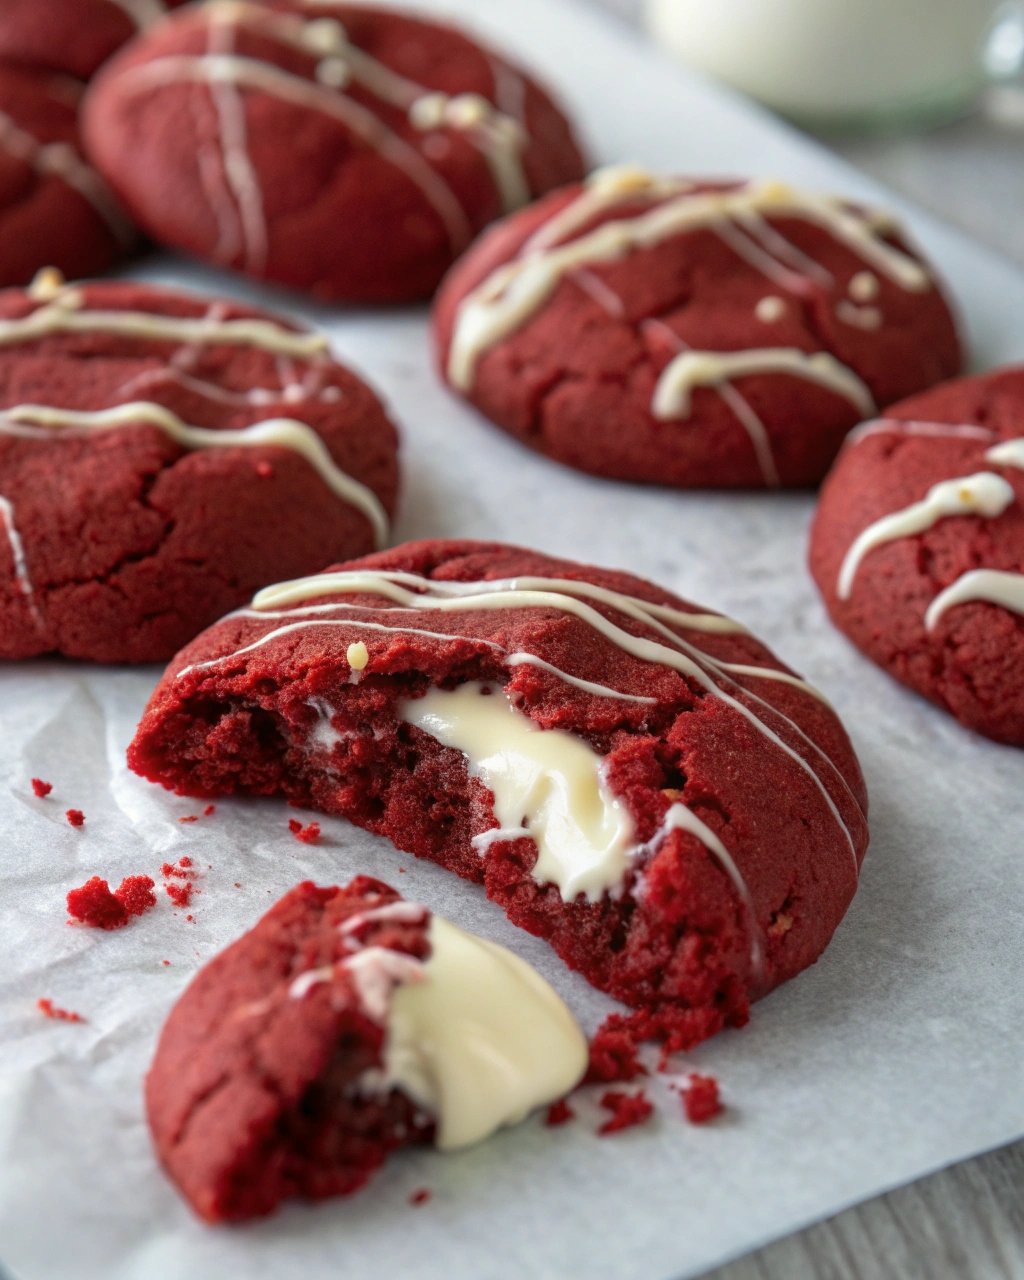
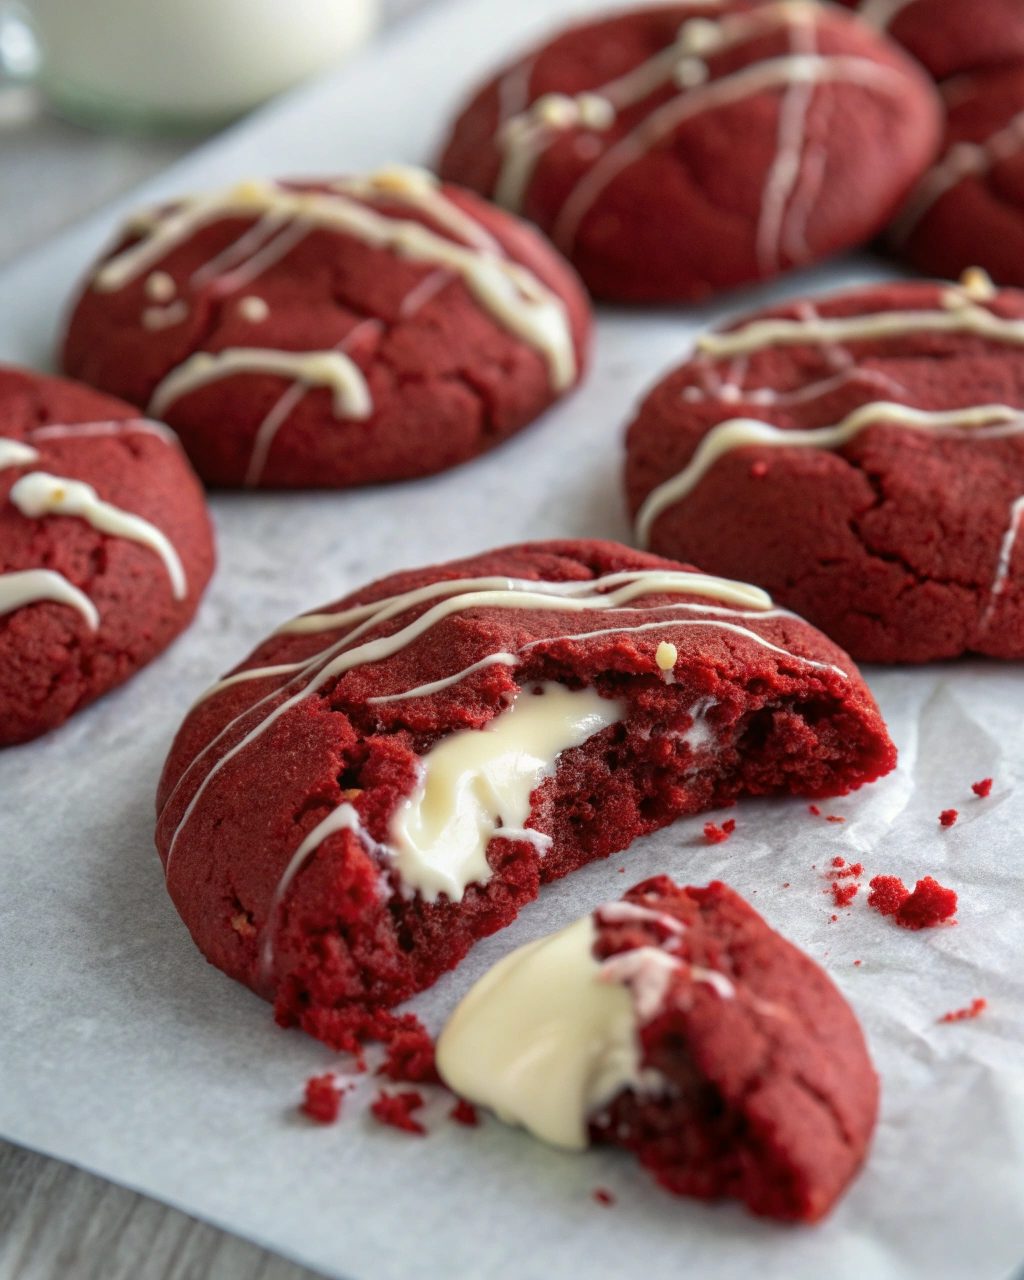
These soft and chewy red velvet cookies are irresistibly indulgent, featuring a luscious cream cheese filling at the center that melts into every bite. With their iconic crimson hue, tender texture, and subtle cocoa flavor, these cookies are the perfect balance between decadent and comforting. Whether for holidays, gatherings, or just an afternoon treat, they’ll quickly become a family favorite.
Why You’ll Love This Recipe
-
Unique twist on a classic: Traditional red velvet cake flavors reimagined in a portable cookie form.
-
Creamy surprise inside: A hidden cream cheese filling that adds richness and creaminess.
-
Perfectly chewy texture: A special mixing method ensures thicker, chewier cookies every time.
-
Make-ahead friendly: Dough and filling can be prepared in advance for easy baking later.
-
Picture-perfect: Their vibrant red color and optional white chocolate drizzle make them look bakery-worthy.
Soft and Chewy Red Velvet Cookies
Red velvet desserts have always carried a sense of nostalgia and celebration. Their vivid crimson hue and delicate balance of cocoa and vanilla create a flavor profile that is unlike any other. Turning this iconic flavor into a cookie elevates it from a slice on a plate to something you can hold in your hand, perfect for sharing, gifting, or simply savoring in a quiet moment with a glass of milk or a cup of coffee.
These cookies are designed to capture all the essence of red velvet cake, but in a way that feels even more indulgent. Instead of a layer of cream cheese frosting spread across the top, you get a rich, creamy surprise tucked into the very center of each cookie. Every bite delivers contrast — chewy edges that yield to a soft middle, followed by a tangy cream cheese filling that balances out the sweetness.
Texture plays an essential role in what makes these cookies special. Many red velvet cookies lean toward cakey, which can feel heavy and dry, but this recipe uses melted butter and a clever resting-and-mixing technique to create a dough that bakes up with chewy centers and just the right amount of structure. The result is a cookie that feels substantial yet tender, with a pleasant bite that lingers.
The cream cheese filling itself deserves attention. It isn’t just mixed and slapped into the dough; it’s whipped until airy, frozen into portions, and then carefully wrapped in cookie dough to ensure every single cookie has a creamy core. This step ensures consistency and makes each cookie feel like a bakery-level creation, without the need for complicated techniques.
Flavor-wise, these cookies lean into balance. Red velvet is not meant to be overly chocolatey, nor plain vanilla — it sits in the middle, enhanced by just enough cocoa to bring depth. The addition of vinegar, while subtle, is a nod to the traditional red velvet formula. It works quietly in the background to intensify the color and tenderize the dough, helping the cookies maintain their signature soft bite.
One of the biggest strengths of this recipe is how forgiving it is when it comes to preparation. Both the filling and the dough can be made in advance, meaning you can pace yourself. If you love fresh-baked cookies but don’t always have the time, you can assemble the dough balls with filling inside, freeze them, and bake whenever the craving hits. This flexibility makes them not just impressive, but practical.
In terms of presentation, these cookies offer options. Left plain, they have a rustic charm, with their crimson color and rounded, chewy form speaking for themselves. But if you’d like to dress them up, a drizzle of white chocolate can elevate them into something elegant enough for a dessert platter or holiday spread. This simple touch adds not only visual appeal but a creamy sweetness that pairs beautifully with the cocoa undertones.
Biting into one of these cookies offers more than just flavor; it’s an experience. The crisp edges give way to softness, the filling contrasts with the chewy dough, and the cocoa plays harmoniously against the tang of cream cheese. It’s a dessert that makes you pause, savoring the interplay of textures and flavors in a way that feels indulgent yet comforting at the same time.
Serving these cookies is a joy, because they appeal to so many. Children love the excitement of discovering the creamy center, while adults appreciate the balance and sophistication of the flavors. They’re equally at home on a casual weekend table as they are at a holiday gathering, making them one of those rare recipes that adapts to every occasion.
Because of their color and elegance, these cookies are a natural choice for special moments. They look striking in a Christmas cookie tin, serve as a perfect Valentine’s Day treat, and can even shine as part of a wedding dessert table. They’re festive without being fussy, and they hold their own among a lineup of other sweets.
Another wonderful aspect of this recipe is how approachable it is. Even if you’ve never made stuffed cookies before, the steps are clear and manageable. Freezing the filling ensures it doesn’t leak, and wrapping the dough around it is surprisingly simple once you get the hang of it. It’s a recipe that feels advanced when served but is accessible for home bakers at any level.
Storage is also straightforward. These cookies stay soft in an airtight container for several days, making them a great make-ahead option for parties. If you’d like to prepare even further in advance, baked cookies freeze well and can be thawed for a quick, impressive dessert with little effort.
At their heart, these cookies are about indulgence. They’re not the kind of treat you rush through — they encourage slowing down, appreciating the softness of the dough, the richness of the filling, and the memory of red velvet’s timeless appeal. They remind us why red velvet remains a beloved flavor, generation after generation.
And while they carry that sense of tradition, they also feel new and exciting in this cookie form. They’re familiar yet surprising, comforting yet elegant. Each bite is a reminder that the simplest flavors, when done well, can create a truly memorable experience. These cookies embody everything that makes baking such a joy — flavor, creativity, and the ability to bring people together over something delicious.
Servings
Yields: 16 cookies
Time
-
Prep Time: 40 minutes (plus chilling and freezing)
-
Cook Time: 10–11 minutes per batch
-
Chilling/Freezing Time: 4 hours (for filling and dough)
-
Total Time: About 5 hours (including resting/chilling)
Ingredients
Cream Cheese Filling (Prepare Ahead)
-
3 ounces (85 g) cream cheese, cold, cut into cubes
-
1/4 cup (57 g) unsalted butter, softened
-
1 cup (113 g) powdered sugar
-
1/8 teaspoon vanilla extract
-
Pinch of salt
Red Velvet Cookie Dough
-
2 1/3 cups (290 g) all-purpose flour
-
2 tablespoons (10 g) natural cocoa powder, sifted
-
2 teaspoons (5 g) cornstarch
-
1/2 teaspoon baking soda
-
1/4 teaspoon baking powder
-
1/2 teaspoon salt
-
3/4 cup (170 g) unsalted butter, melted and slightly cooled
-
1 cup (200 g) light brown sugar, packed
-
1/2 cup (100 g) granulated sugar
-
1 large egg + 1 yolk
-
1 teaspoon vanilla extract
-
1–2 teaspoons red gel food coloring (adjust to intensity desired)
-
2 teaspoons distilled white vinegar
Optional Garnish
-
1 ounce (28 g) white chocolate, chopped and melted for drizzle
Instructions
Make the Filling
-
In a mixing bowl, beat softened butter until smooth.
-
Gradually add powdered sugar, salt, and vanilla; beat until fluffy.
-
Add cream cheese cubes one at a time, mixing until completely smooth and lump-free.
-
Beat until light and creamy, about 2 minutes.
-
Scoop tablespoon portions onto a lined tray; freeze for at least 2 hours or overnight.
Make the Dough
-
In a medium bowl, whisk flour, cocoa powder, cornstarch, baking soda, baking powder, and salt. Set aside.
-
In another bowl, beat melted butter with brown sugar and granulated sugar until well combined.
-
Mix in the egg, yolk, vanilla, and food coloring until smooth. Rest 3 minutes, then whisk again. Repeat 3 times for a chewier texture.
-
Stir in vinegar.
-
Fold dry ingredients into wet until just combined. Do not overmix.
-
Chill dough 30 minutes if too soft.
Assemble Cookies
-
Scoop 3-tablespoon portions of dough; press a deep indentation into each.
-
Place one frozen filling scoop into the indentation. Wrap dough around filling, sealing completely.
-
Roll into smooth balls and refrigerate at least 2 hours.
-
Preheat oven to 350°F (180°C). Line baking sheets with parchment.
-
Arrange 8 cookies per tray, spaced apart.
-
Bake 10–11 minutes until edges set but centers look slightly underdone.
-
Cool on tray for 15 minutes, then transfer to wire rack.
Optional Decoration
-
Drizzle cooled cookies with melted white chocolate and let set.
Tips
-
Freeze filling well: Soft filling will leak during baking. Ensure it’s solid before wrapping.
-
Don’t overbake: The cookies firm as they cool; removing them while slightly soft ensures chewiness.
-
Food coloring: Gel food coloring provides richer color without affecting texture.
-
Storage: Store at room temperature in an airtight container for 3–4 days, or freeze baked cookies up to 1 month.
-
Flavor variation: Add a hint of orange zest to the dough for a citrusy twist.
Soft and Chewy Red Velvet Cookies
Ingredients
Cream Cheese Filling (Prepare Ahead):
- 3 ounces 85 g cream cheese, cold, cut into cubes
- 1/4 cup 57 g unsalted butter, softened
- 1 cup 113 g powdered sugar
- 1/8 teaspoon vanilla extract
- Pinch of salt
Red Velvet Cookie Dough:
- 2 1/3 cups 290 g all-purpose flour
- 2 tablespoons 10 g natural cocoa powder, sifted
- 2 teaspoons 5 g cornstarch
- 1/2 teaspoon baking soda
- 1/4 teaspoon baking powder
- 1/2 teaspoon salt
- 3/4 cup 170 g unsalted butter, melted and slightly cooled
- 1 cup 200 g light brown sugar, packed
- 1/2 cup 100 g granulated sugar
- 1 large egg + 1 yolk
- 1 teaspoon vanilla extract
- 1 –2 teaspoons red gel food coloring adjust to intensity desired
- 2 teaspoons distilled white vinegar
Optional Garnish:
- 1 ounce 28 g white chocolate, chopped and melted for drizzle
Instructions
Make the Filling:
- In a mixing bowl, beat softened butter until smooth.
- Gradually add powdered sugar, salt, and vanilla; beat until fluffy.
- Add cream cheese cubes one at a time, mixing until completely smooth and lump-free.
- Beat until light and creamy, about 2 minutes.
- Scoop tablespoon portions onto a lined tray; freeze for at least 2 hours or overnight.
Make the Dough:
- In a medium bowl, whisk flour, cocoa powder, cornstarch, baking soda, baking powder, and salt. Set aside.
- In another bowl, beat melted butter with brown sugar and granulated sugar until well combined.
- Mix in the egg, yolk, vanilla, and food coloring until smooth. Rest 3 minutes, then whisk again. Repeat 3 times for a chewier texture.
- Stir in vinegar.
- Fold dry ingredients into wet until just combined. Do not overmix.
- Chill dough 30 minutes if too soft.
Assemble Cookies:
- Scoop 3-tablespoon portions of dough; press a deep indentation into each.
- Place one frozen filling scoop into the indentation. Wrap dough around filling, sealing completely.
- Roll into smooth balls and refrigerate at least 2 hours.
- Preheat oven to 350°F (180°C). Line baking sheets with parchment.
- Arrange 8 cookies per tray, spaced apart.
- Bake 10–11 minutes until edges set but centers look slightly underdone.
- Cool on tray for 15 minutes, then transfer to wire rack.
Optional Decoration:
- Drizzle cooled cookies with melted white chocolate and let set.
Notes
- Freeze filling well: Soft filling will leak during baking. Ensure it’s solid before wrapping.
- Don’t overbake: The cookies firm as they cool; removing them while slightly soft ensures chewiness.
- Food coloring: Gel food coloring provides richer color without affecting texture.
- Storage: Store at room temperature in an airtight container for 3–4 days, or freeze baked cookies up to 1 month.
- Flavor variation: Add a hint of orange zest to the dough for a citrusy twist.